Friday, May 16, 2014

Eight EASY Steps to making your own GREAT KOMBUCHA!

"Hi", and Welcome to my Blog, I'm not super Active on this Blog - but every once in a while I like to post something really fun. We had an insanely cold and "harsh on the garden" winter this past season, and I lost about 90% of my herb garden so, I had to replant everything. I am even thinking that maybe my Fig tree died, and that makes me very sad, Scot and I keep checking it every few days, and so far - no buds :-(.

I am however hopeful that the cold killed some of the wood boring insects that have been reeking havoc on my apricot, nectarine, and peach trees, maybe this year I'll actually get a substantial harvest.
Fingers Crossed.

OK - so the reason for today's post..... KOMBUCHA!!!

I was recently introduced to this amazing magical drink, it is kind of like a Beer/Soda that is packed with and wonderful Probiotics that help digestion. Depending on where you live when you make it, the different bacterium grow in it and it will produce a brew that tastes yummy and even better, is beneficial to your GUT!

Here is my motivation for learning how to make it - the stuff is a whopping $3.69 a bottle!!!! There is even a shop close to home that makes it on a smaller "mom and pop" scale and there's is $20 a bottle, granted it is three times the size of the commercial brand, and is amazingly delish, but really???? After doing the math, I figured out that it only costs pennies to make - GOOD MOTIVATION for me.

"I wonder if the companies that make it charge that much because it is "good" for you?"  Who knows.... anyway - I want to post here how I have been making it.


Eight EASY Steps to making your own GREAT KOMBUCHA!


One.

First pick a really good store bought brand that says "RAW ORGANIC KOMBUCHA" on the label. It has to say "RAW" because if it is pasteurized (cooked) the dummies who made it killed all the good bacterial organisms in it by cooking it.  Then you just have soda that has dead bacteria in it. Yuck!!!


Two.

Drink most of it, but be careful to leave the sediment and the floaty stringy/strands in the jar, and stick it back in the fridge. This is called your "Starter". I do this by pouring it off into a white wine glass, not only does it look fancy, but your friends can't tell you aren't "drinking". This is what you are going to use to make your "Baby Scoby" from. It really only looks funny in the wine glass when you to it first thing in the morning. :-)


Three.

Boil about a cup and a half of FILTERED (or bottled with no chlorine) water. This is very important not to use water that has chemicals in it, because it can kill your bacterium. Add 1/3 cup of regular refined sugar (I use powdered sugar, just because that is what I have left in the pantry after my big purge, it seems to really work well) and about a teaspoon of honey to the boil and let it dissolve. Pick a bag of your favorite Organic tea (it must be Black, Red, or Green for this step, because of the acid content - DECAF does not work well because of the chemicals) and let it boil into the water sugar mixture for a few minutes. Turn off the heat, and let it cool to room temp.


Four.

Take out your starter from the fridge, and let that sit on the counter until the Tea mixture has cooled down. When it is cool enough to touch, pour it into a mason jar, with the starter, cover with cheese cloth and tighten the lid on it. This will need to sit in a dark warm place for a few days to a week, depending on the air temp.


Five.

Once you see about an eighth of an inch "Baby Scoby" floating on the top you will need to feed it. Sometimes this "Baby" will not be easy to see so you can carefully lift the jar and tilt a little, you should see a thin film on the surface that may have a couple white spots. IT SHOULD NOT HAVE MOLD!!! if it does toss it and start over. The reason you used FILTERED water, and BLACK, RED OR GREEN tea is why you don't get mold. Anyway, the next step is easy; In a sauce pan pour 2 cups of FILTERED water and bring to a boil. Add 1/3 cup of regular refined sugar and about three teaspoons of honey to the boil and let it dissolve. This time pick TWO bags of your favorite Organic tea (it must be Black, Red, or Green for this step, because of the acid content) and let it boil into the water sugar mixture for a few minutes. Turn off the heat, and let it cool to room temp.


Six.

This is the step where you actually grow your "Mother Scoby"! Add the new batch of super sweet tea to a larger jar cover it tightly with cheese cloth and a rubber band. Place it in a dark warm place for a few days to a week, depending on the air temp. She will show up and form a really beautiful gelatinous mushroom like cap at the top. This is your "Mother".


Seven.

Now you are ready to make your drinkable KOMBUCHA. Heat three quarts of FILTERED water to a boil, add 1 cup sugar, and three tablespoons of honey until it is clear and completely dissolved. Add 4 tea bags of your favorite Organic tea (here it can be a different type of tea like White, or flavored, I add ginger at this point too, but it must be TEA because of the acid content). Turn off the heat, and let it cool to room temperature, remove the tea bags, fruit Ginger etc. and pour it in a larger glass jar.

Float your "Mother Scoby" on top of the newest sugar mixture using a large stainless steel spoon.
It's okay if it sinks, mine usually does.


Next, you want to pour in a cup or two of finished liquid from the last batch (to keep the acid high) and Cover it securely with cloth and a rubber band, and place it in a dark warm place for a week to ten days.


After waiting patiently you will see a new "Baby Scoby" on the surface of your KOMBUCHA. When the new "Baby" is about 1/8" thick, taste your KOMBUCHA. If it is too sweet, let it sit a few more days, if it is ready (you be your own judge) you can harvest the liquid by pouring (I use a syphon method)into bottles with removable lids, like the grolsch beer bottles or the GT bottles.

Eight.

Bottle, and add your favorite fruits, put a teensie bit of sugar, about a 1/4 teaspoon in each bottle, make sure the cap is tight and let it sit in a warm dark place for a day or two - but keep an eye on it every day, you may need to burp it, because sometimes the pressure of the bubbles can make the KOMBUCHA explode! OMG!!! what a mess that is to clean up.... When it gets to the desired bubblyness it is time to refrigerate and enjoy.


NOTE: The extra sugar makes it really bubbly, a trick I learned from making beer. Make sure you SAVE some of the stringy bits, and a little of the KOMBUCHA for your  next batch.

Thursday, March 6, 2014

Update on the seedlings

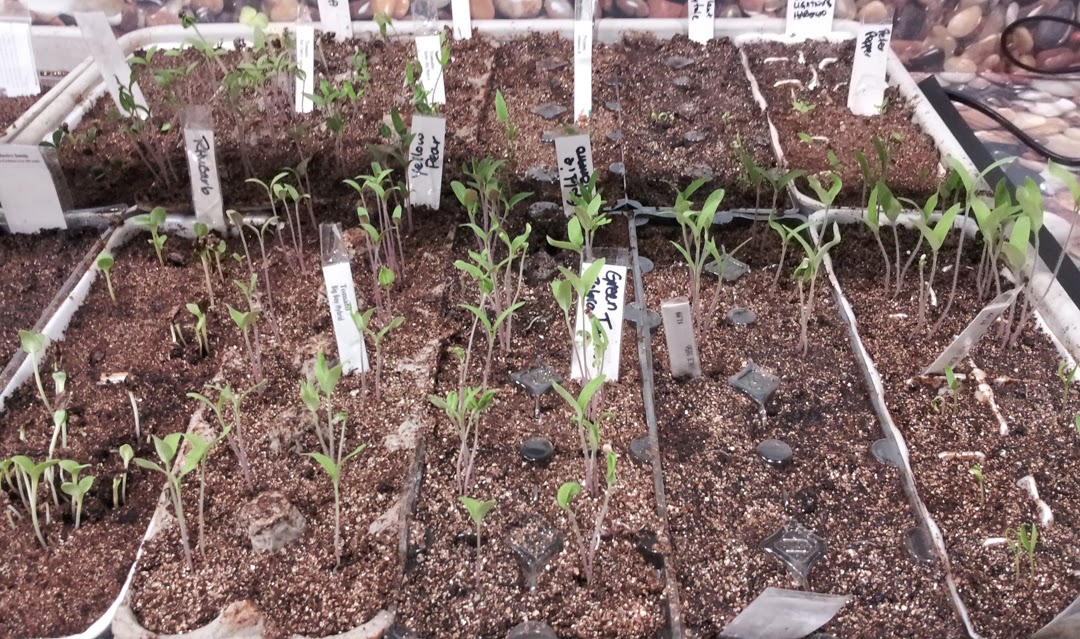
So my little seedlings are doing great - Most of them have come up and are about 2 inches tall. All my tomatoes are up and getting bigger. I have the grow light, and the heating mat on a timer - Now if it would just STOP snowing!!!

Wednesday, February 26, 2014

Start your seeds Now for 2014 Fruit and Veges

Hello Everyone out there. I know I have been lax about my blog the last few years I am back, and am sure that it will be much better this spring into summer. I have already planted my indoor seeds over the weekend on Feb 23rd. I have planted a variety of tomatoes, peppers, eggplant. I have also planted Culantro which is a Peruvian herb that tastes like cilantro, but about ten times more potent. Rhubarb, Okra, Swiss Lupine, Lavender, and purple Tomatillo. I was out of some of my favorite seeds like Swiss Chard, Basil, and a few heirloom lettuces so I have ordered them - and will plant indoors when they come.

This year I am using a new technique that I am hopeful will produce better germination for me. I got a professional heating mat designed specially for seed starting, and I also got a real grow light, like the kind that the hydroponic growers use. The mat is great and stays about 70 degrees 24 hours a day. When the seeds do finally start to germinate I will set up the light on a timer. My old technique was just ok - but the harder seeds to grow just never got a good start like my peppers and eggplant, so I didn't get to eat any. Also, sometimes my tomatoes were a little stringy, Maybe the light wasn't strong enough, who knows.

Using the Jiffy organic seed starter mix in egg cartons works the best for me. I usually put three seeds in each cup, and pinch the weakest seedlings and the sprouts that grow deformed leaves as they start to get a little bigger (about 3 inches tall).

Deformed Leaves = Deformed Fruit

Here is a good shot of what my seed starting trays look like.


Tuesday, May 10, 2011

Bees Wonderful Bees

Oh the joy of these wonderful little BEE girls!


The really big ones are Drones those are the Males - they are actually pushed out of the hive and starved to death in the fall when the Queen no longer needs them for reproducing. You can see here in this real close up picture a Drone and a worker bee side by side how much bigger he is, also the Drone bees do not have stingers.


My neighbors Charlie and Ann Francis have two hives, they were trying to see if they could get their Queen to clone to make another hive this morning. (the guy with the white beard is Mike Charlie's friend who also keeps bees)


I was totally amazed at how close I could get to the hive!


The bees were so calm.


The sound of the humming workers, and the smell of the honey was astounding and a little overwhelming too. The color of the honey is just beautiful. That crack in the middle is PURE honey!


Charlie's friend Mike was there helping too, they are all suited up - of course I was not, and with my curly hair one of those little girls buzzed right in there, and got stuck, freeked out, and stung me right on top of my head. Lucky for me I am not allergic. But now I know what it feels like to have a bee sting. It is not so bad, and totally worth it.
 Charlie gave me a little honey comb, and that sweet nectar, oh so good. Yum!


The bees live off of it all winter long, so it is important not to steal too much of it from them or else they will die - we have to remember that it is there food.


Thank you so much Charlie, Ann Francis, and Mike for letting me watch you guys hard at work today doing your thing with the bees. I loved it! and had a great time. Even though I got stung. Next time I will wear a Hat! 


Thursday, November 4, 2010

Putting it away now

Sad to say but the garden is going to sleep for the winter - I picked all my last stragglers - and made 9 jars of pesto. There are still a few tomatillos, and peppers on the vines. It is getting cold.

See you in the Spring

Wednesday, October 6, 2010

October Gardening tip - When to Plant Garlic


Garlic is a tasty plant that can serve to liven up a wide variety of dishes. It is extremely popular in a wide variety of cultures  from the Orient to Latin America. Fresh grown garlic retains a lot more flavor as it can be taken directly from the ground and used. Your garlic crop will flourish if you know the appropriate time to plant it.

That time is NOW for Baltimore ( I usually plant on Columbus day) that is how I remember when to plant my bulbs. You also must buy bulbs for a reputable seed catalog - do not plant bulbs you buy at the grocery store - those are most likely treated with some kind of chemical for preservation, and will not grow in a home garden.

Garlic only grows well in either temperate or warm temperate areas, so Baltimore is PERFECT!

Find a mostly sunny spot that has well draining soil - loamy soil is best - you can add peat moss to get this desired soil. Then plant the bulbs 6" apart from each other.

Mulch the ground around your garlic in the late fall, to prevent the bulb from being forced out of the soil (a process known as heaving). Make sure to move away the mulch when spring rolls around. - You can use fallen leaves for this - the decomposition of the leaves is great for your soil.


Although the warm temperatures will keep the bulb in a hibernating state for several weeks, it will begin to grow slowly during winter. The cold of winter is necessary to encourage the growth of the side buds which form the cloves of the garlic. They will form into those tasty cloves in the late spring or early summer.